DIY Miso
We finish delving into homemade soyfoods with miso, one of the principle flavorings of Japanese cuisine. In fact, it is unheard of for many Japanese to have a day pass in which they at some point do not have a bowl of miso soup; there are even Japanese cookbooks providing recipes a different miso soup for every day of the year. Miso’s origins lie within fermented Chinese pastes called ‘chiang’ which were historically made from any number of protein-rich ingredients, including shellfish and meat. In the Analects of Confucius it is said that “foods not accompanied by the appropriate variety of chiang should not be served.” In the 7th Century B.C., in the rituals of the Chou Dynasty, it is mentioned that “one hundred and twenty crocks of chiang were stocked for a party.” Around 500 AD the production of chiang using soybeans as the protein source was developed. Chinese traders then helped migrate soybean chiang south into Indonesia (where it was called taucho), Vietnam (tuong), and Thailand (tao-chio). The same fermentation process was also used on fish to create the salty fish sauces (nuoc mam in Vietnamese) so prevalent in southeast Asian cuisines. It is interesting to note that either through independent evolution, or by the sharing of information along the Silk Road, the Romans also extensively used a fermented fish sauce not unlike nuoc mam in their cooking, which they called garum. In modern times in the west, Worcestershire Sauce (also a fermented product) takes on a similar function, and may be a direct descendant of this Roman condiment. Soybean-based chiang migrated into Japan via Buddhism about 100 years after its development in China. Over time, this product was refined and altered until it became something unique to the Japanese – with the term ‘miso’ being coined by 900 AD. Miso is produced through a two-step fermentation process in which first the fungus Aspergillus oryzae (or related species) are allowed to infect steamed grains or soybeans, creating what is called ‘koji’. The koji is then mixed with cooked soybeans, water, and salt in the second stage, where enzymes in the now inactive Aspergillus break the soybeans down into more simple chemical compounds. Some of these are then converted to various more complex organic acids, esters, and alcohols by a large number of salt-tolerant yeasts and bacteria living in the fermenting mixture. At the end of this process (perhaps 3 years later) the rather indigestible soybeans have been converted into an array of simpler organic chemicals that are easily used by the human digestive system. A few words about the primary fermentation are in order. The principle goal of this process is to make a great quantity of mold hyphae that contain protease, amylase, and lipase enzymes which assist in breaking down the complex soybean proteins, carbohydrates, and lipids (respectively) into peptides and amino acids, polysaccharides and simple sugars, and simple free fatty acids. Because the principle substrate for many misos are either rice or barley, the high carbohydrate concentration of these grains means that enzymatic activity will ultimately lead to the production of sugars. The creation of koji is thus exactly analogous to the malting of grains in the west, as in both cases enzymatic activity is being used to make simple sugars from complex carbohydrates. While enzymes in Aspergillus mediate this process in koji, in malting the grains are allowed to sprout with the amylases being created by the germinating plants themselves. It is interesting to note that in both cases this enzymatic creation of sugar from starch was used in combination with secondary alcoholic fermentation to make sake on one hand and beer in the other. Like we did before with tempeh we’re going to manipulate the fermentation environment to ensure that the correct microbes dominate the miso community, and not ones that will make us sick. In terms of the primary fermentation, we’ll make sure that the grains are cooked by steaming, thus preventing them from becoming waterlogged. This ensures that there will be plenty of oxygen available for the Aspergillus to use, and prevent the growth of anaerobic microbes. We’ll also keep the temperature of the grains at a constant 85° F., the optimal temperature for Aspergillus growth. Last, we’ll initiate fermentation with a great quantity of Aspergillus spores through a starter mix, giving it the opportunity to crowd out any other potential competing organisms. In the secondary fermentation, we’ll ensure that beneficial microbes – and not harmful ones like Escherichia coli or Staphylococcus aureus – dominate by excluding oxygen and putting high levels of salt in the mixture. The creation of first koji and then miso is no harder than making tempeh, with the most difficult part of the process being patiently waiting for fermentation take place at room temperature. Note that by changing the type of koji grain (rice or barley or wheat), the ratio of koji to cooked soybeans, and the salt content, a multitude of different miso styles can be made. Please refer to the charts and tables in The Book of Miso to see how the various types of miso can be made. The following recipe is for a relatively rapid fermenting mellow barley miso, which will require 2-3 months of secondary fermentation. When this is ready (the illustrated batch should be finished sometime in May or June) we’ll update the blog to show you the final product. This recipe will make about 1 gallon of miso. [MAY 31 UPDATE: we have now removed the miso from its crock and packed it for long-term storage. You can now see what the final steps and the finished product looks like.] Step 1: Barley Koji3 pounds (about 7 heaping cups) of pearled barley Place barley in a bowl, and cover with cold water. Mix with your hands, allowing the water to become chalky. Drain off water and repeat 3-4 times until the water remains clear. Cover deeply with cool water and let soak for 3 hours. Turn on your incubator and make it is set for 85° F.
Scrub two steamer trays with boiling water, and let dry in a sunny place. When the grains are done soaking, drain them in a colander. Half-fill a large pot with water, and bring to a boil. Place a clean cotton tea towel into the bottom of each steamer tray. Place half of the soaked barley into each tray, fold the overhanging part of each tea towel over the barley, and stack the steamer trays over the boiling water. Steam for 50 minutes; then swap the two trays, putting the bottom on top and the top on bottom. Making sure there is enough water in your pot, continue steaming for another 50 minutes. The barley will be fully steamed when the grains become somewhat transparent and slightly rubbery.
While the barley is finishing steaming, mix well the koji spore powder or starter into the flour. Also, place a muslin towel at least 3’ x 2’ into the bottom of the incubator. When the barley is done steaming, transfer it onto the muslin towel in the incubator. Using a wooden spoon or paddle, spread it to a uniform depth. Insert a thermometer into the barley, and wait until the temperature drops to 110° F. Sprinkle ½ of the flour-koji mixture over the barley and mix thoroughly with the spoon / paddle, breaking up any lumps of barley. Don’t forget any bits of barley, as these will not turn into koji. After mixing for 2 minutes, sprinkle on the rest of the flour-koji mixture, and continue mixing for another 2 minutes, continuing to break up any lumps.
Mound the inoculated barley in the center of the incubator. Insert the thermometer, and wrap the mound with the edges of the muslin towel. Put the top on the incubator, and turn on. Check the incubator occasionally over the next 6-8 hours to make sure that the barley temperature stays between 75°-95° F.
After 24 hours, open the incubator and unwrap the barley mound. Flatten it out into an even thickness on the towel across the bottom of the incubator. If the grains seem like they are drying, you can mist them lightly with a bit of water using a spray bottle. Reinsert the thermometer, and re-wrap the top with the rest of the muslin. Put the incubator top back on. Keep checking the temperature of the grain bundle to make sure that it stays below 95° F. At some point the Aspergillus will become visible and in 12 hours or so will becomes a white felt that will bind the grains together. As this happens, there will be enough fungus present in the bundle to begin to generate heat, and the temperature will begin to exceed 90° F. Once you see the first evidence of yellowing in the fungal growth (usually on the edges of the bundle) it is time to check to make sure the koji has penetrated at least 2/3 of the way into the grains. This can be done by breaking a few grains in half. Do not let the koji begin to turn green. If it does the smell will become musty and over-fermentation will have happened. You will not want to use this grain for miso! Once you feel the koji is done (and this may take up to 48 hours from initial inoculation), remove it from the incubator and scrape the grains from the muslin towel onto a large metal tray. Let the koji drop to room temperature, and then put the pan into a refrigerator. When cool and dry (1-2 hours should be fine), place the koji into a sealable plastic bag. Store in the refrigerator.
Step 2: Making your own koji starter.Koji spores cost from $4-$12 for 10-15 grams, or enough to make about 5-7 of the above batches of koji. While you can keep buying starter, it is very simple to make your own for future use. Remember to keep your utensils and work space very clean, and you should have no problems in maintaining a pure culture. We’re now using 3rd generation homemade koji spores, and it is making as good of koji as it did with the initial spore sample. Here’s how you do it: When bagging the finished koji grain, retain 1-2 cups, place in a clean bowl, and return to the incubator. Let it continue fermenting for another 24 hours. The grains will eventually turn olive-green from ripe Aspergillus fruiting bodies. When all of the grains have turned deep olive green, remove the bowl from the incubator. When you brush against the grains a green dust will rise into the air. These are the ripe koji spores. The best way to keep them from floating away is to pour ½-1 cup of unbleached white flour over the top of the green grains: the flour dust has a static charge that will help grab onto the spores. Mix the flour and grain together with clean hands, and then pour this mixture into a plastic bag. Close the seal and then rub the grains vigorously into the flour. The flour will become pale olive green. When the flour color stops getting any greener (perhaps 3-4 minutes), empty the mixture into a clean sieve, and shake the flour-koji spore mixture through the sieve into a clean bowl, leaving the grains behind. Pour the koji-flour starter into a clean plastic bag and seal. Write the type of koji on the bag and the date. Then place in the freezer. The starter should keep for years.
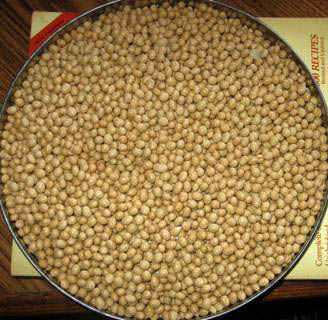
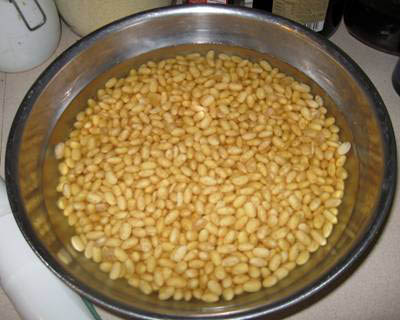
Step 3: Making Miso4 cups dry soybeans, preferably a human food-use strain like Shinonome Wash beans and cover with cool water. Let soak for 3-4 hours or until the beans have swelled and tightly fill their hulls. Drain beans, and place in a heat-proof bowl that will fit into a pressure cooker. Fill pressure cooker with at least 3” of water. Place beans in pressure cooker and top off bowl with water. Seal cooker, heat to boiling, and bring to 15 pounds of pressure. Cook beans for 25 minutes, turn off heat, and let cool until pressure returns to normal. Take off pressure cooker lid, and carefully remove the bowl with the beans – it will be hot!
Drain the beans into a colander, saving the bean cooking water. Mash the beans with a potato masher or immersion blender. If you like a chunky miso, stop when about 1/3 of the beans remain whole; if you like it smoother you can continue mashing until all of the beans have been processed. Insert a thermometer into the mashed beans and let cool to 110° F.
Measure 5 cups bean cooking water, and use the thermometer to make sure this, too, is no more than 110° F. Mix into the bean water all but 2 tablespoons of the salt, and seed miso (if used). The seed miso is used to help initiate secondary fermentation by anaerobic, salt-tolerant microbes. It is not strictly necessary, as these organisms exist in the air, but adding in a bit of miso with these live cultures will ensure that they are present in large numbers and will shorten the amount of time needed in secondary fermentation. Moisten the inside of your crock, and rub all but 1 teaspoon of the remaining salt onto bottom and sides. Spoon in miso mixture, packing firmly to expel all air pockets. When all the miso is in the crock, smooth the surface, and sprinkle the top with the last 1 teaspoon of salt. Wrap the crock in a large plastic bag, and then place the cover on the crock.
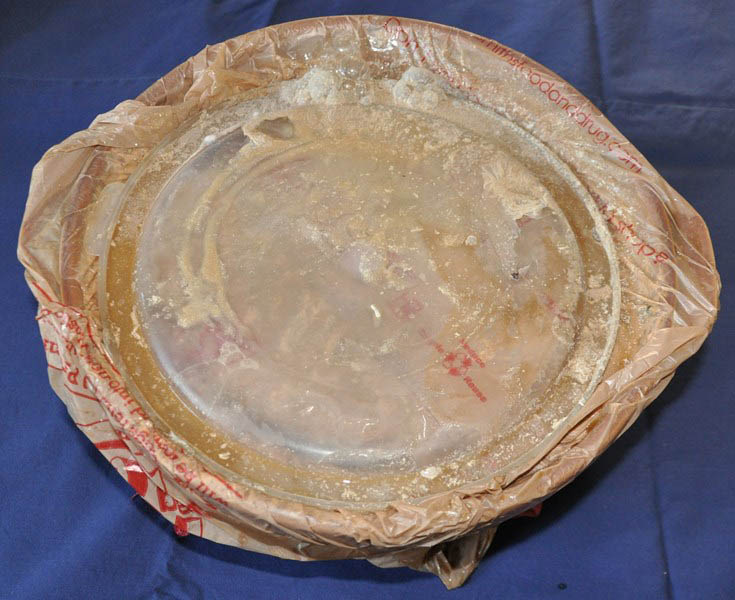
Move the crock to the location that you will let it ferment, preferably somewhere in an unheated garage, storage room, workshop, or barn which receives no sunlight. Living spaces and basements are not optimal, as the temperature will not change much from winter to summer. Because the miso may weep salty water during fermentation, it may be a good idea to place the crock into some sort of basin. Place the lid on the crock. Because we live in the desert, and did not want our miso to dry out over the long fermentation time, after we shot the picture below we wrapped the crock, lid, and basin in another thick plastic bag. Last we placed a 5 pound weight on top of the lid to press it firmly into the miso.
Now you simply wait and let the secondary fermentation proceed at its own leisurely pace. The most rapidly fermenting misos – like sweet white miso, with secondary fermentation being completed within 4-6 weeks – have a high proportion of koji to soybeans and relatively low salt levels. Miso with lower proportions of koji and higher salt levels take much longer, with red Sendai miso taking 2-3 summers to ferment. All-soybean misos take the longest of all, with more than 3 summers being thought to create the best tasting product. You can check flavor and taste once every few months to see how the fermentation is progressing. To do this, remove lid and plastic bags, and using a clean spoon open a small hole 3-4 inches deep at the center and remove a sample. Compare the flavor to your favorite store-bought miso. If the flavor is too salty or the color too light, you’ll need to let it ferment longer. If the texture is too soft, you’ll need to increase the pressing weight and remove the liquid that comes to the surface. Don’t overdo your testing, as increased exposure to the air will encourage growth of molds and other contaminating organisms. Miso ferments at ambient air temperatures, and thus undergoes periods of slow fermentation when the weather is cold (winter) followed by periods of rapid growth (summer). The age of miso is measured by the numbers of warm summers the fermentation has been exposed to: one year miso has only seen one summer, two year miso two summers, and etcetera. Because miso is generally started in the cold winter months (often at the end of winter in February or March), miso is usually six to -nine months younger than its listed age. When the miso is mature and ready to be used don't be alarmed by its rather shocking appearance. Simply remove all the coverings and scrape off and throw away any surface mold or bacterial scum - which is not dangerous but will lower miso quality. Move the miso into a large bowl and thoroughly mix to equally distribute salt, liquid, and bean paste. Because we like smooth and not chunky miso, we pureed the fermented miso using an immersion blender. However, this is a strictly optional step. Once the miso was smooth we moved it into clean pint or quart jars which we will store in the refrigerator, where it should keep indefinitely.
Remember the fondness for home-made miso is so strong that it gave rise to the Japanese proverb temae miso (手前味噌) which translates literally into “the miso in front of you” and refers to someone who is raving about the greatness of their own home-made miso – or in other words is guilty of self-flattery. Specialized equipmentFirst, you’ll need to find koji spores. These are available in sake-making kits at most home-brewing stores (see Northern Brewer online), or from GEM Cultures, which offers different koji strains depending upon the type of miso you want to make. Second, you ’ll need an incubator that is used only for food fermentation projects. We use the same incubator for koji and tempeh making, and recommend the Little Giant still-air incubator from Miller Manufacturing of Eagen, Minnesota. These are generally available at farm and ranch supply stores. As we said in the tempeh entry, DO NOT USE THE SAME INCUBATOR THAT YOU"VE PREVIOUSLY HATCHED POULTRY IN! Third, you’ll need a food thermometer to make sure that your various substrates have cooled enough before you mix in the living fermentation cultures. Fourth, you’ll probably want a pressure cooker, as soybeans take hours to cook on the stove top, and may never fully hydrate when you live at high altitudes. A pressure cooker will enable you to have properly cooked beans within 1 to 1½ hours no matter where you live, and is well worth the extra cleanup. Fifth, you’ll need a 1 to 1¼ gallon ceramic crock for the secondary fermentation. You do not want to use metal, as long-term exposure to the fermentation products will cause metal to leach into your miso and spoil its flavor. The same tends to happen with plastic containers. Ceramic containers are the most non-reactive and will give you the best-flavored miso. You may want to consider using the ceramic inserts from large crock-pots, as these can sometimes be found for a pittance without their heating elements in thrift stores. Last, if you try this recipe, like it, and want to make more types of miso and in larger quantities, you really need to buy your own copy of The Book of Miso. While it is out of print, the SoyInfo Center provides information regarding a free electronic download. You should also be able to find a second hand copy for a few dollars. |